1. 前言
Spring是一个IOC(Inversion of Control,控制反转)容器框架,拥有DI(Dependency Injection,依赖注入),DL(Dependency Lookup,依赖查找 等功能。
认为一个IOC框架最基本要有以下功能:
- 配置解析
- 对象创建
- 对象生命周期管理
本文基于Spring-5.2.2.RELEASE版本进行论述,为了简明扼要,在展示部分代码的时候省略了一些细节。
Spring Bean的生命周期总结因为没有一个正式的文档,因此是一个比较偏主观的分享,笔者只能结合小马哥的观点与自身的认识情况大概进行了总结,主要思路还是围绕着方法的调用栈,笔者认为,写在一个方法里,那么就可以认为是一个阶段。
2. Spring Bean生命周期
这里po一张我自己画的图:
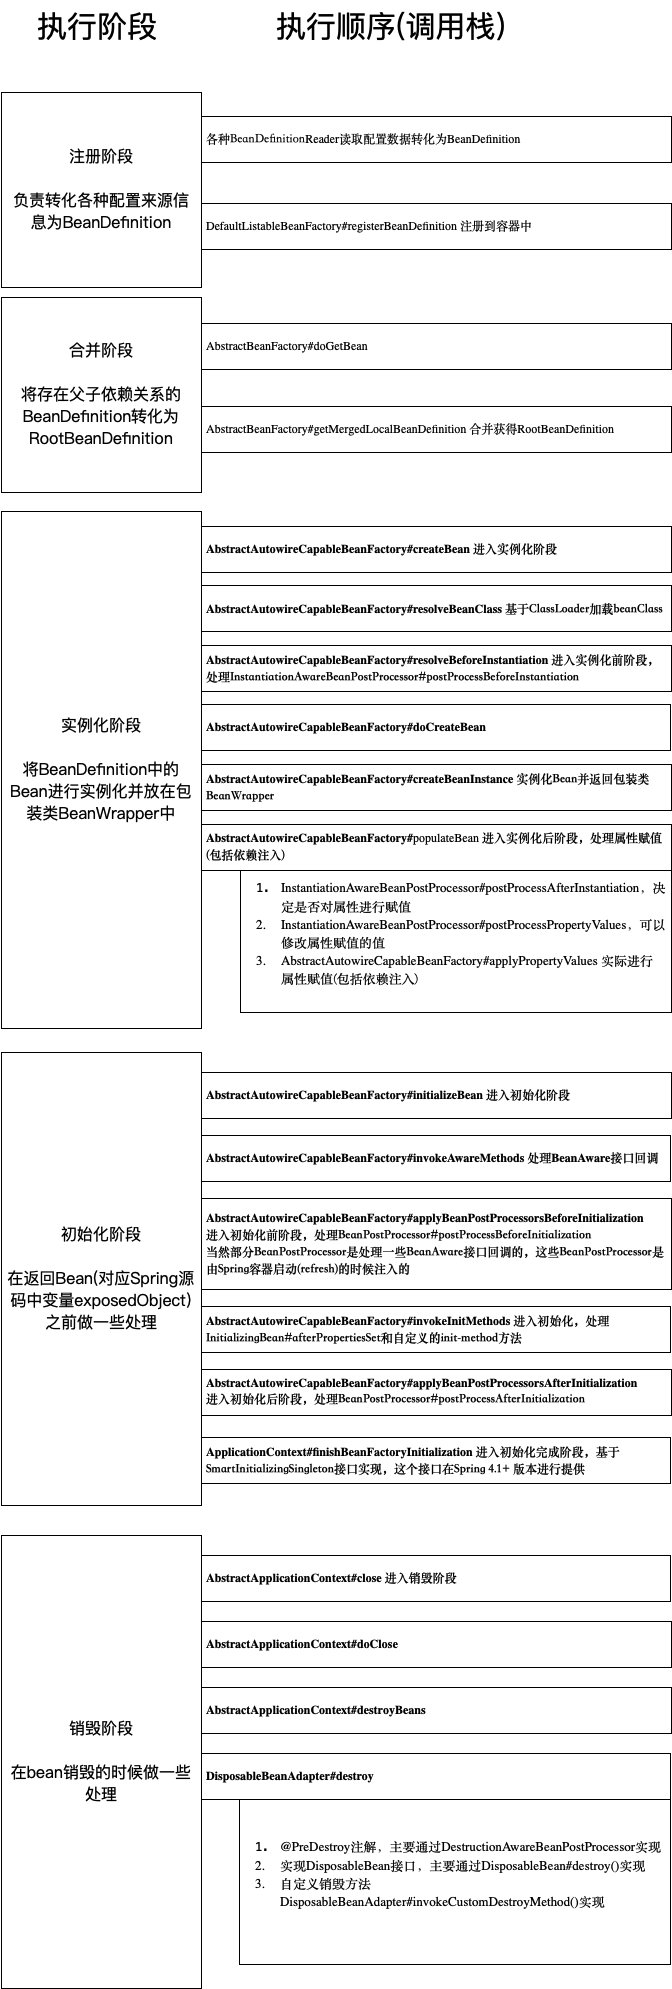
我将SpringBean生命周期分为以下五个阶段:
- 注册阶段
- 合并阶段
- 实例化阶段
- 初始化阶段
- 销毁阶段
下面具体看一下每个阶段所做的事情。
2.1. 注册阶段
注册阶段的主要任务是通过各种BeanDefinitionReader读取各种配置来源信息(比如读取xml文件、注解等),并将其转化为BeanDefintion的过程。
这里要理解一下BeanDefinition的作用。众所周知,Spring提供了多种多样的注册Bean的方法,BeanDefinition的作用就是去定义并描述一个Spring Bean,方便后续解析实例化等操作。
ApplicationContext#register()方法完成了对象注册阶段,其最终是调用的DefaultListableBeanFactory#registerBeanDefinition() 完成的BeanDefinition注册,这里的“注册”意思是将配置信息转化为BeanDefinition并放到合适的容器中,我们可以看以下代码:
public class DefaultListableBeanFactory extends AbstractAutowireCapableBeanFactory
		implements ConfigurableListableBeanFactory, BeanDefinitionRegistry, Serializable {

	/** Map of bean definition objects, keyed by bean name. */
	private final Map<String, BeanDefinition> beanDefinitionMap = new ConcurrentHashMap<>(256);

	/** List of bean definition names, in registration order. */
	private volatile List<String> beanDefinitionNames = new ArrayList<>(256);

	//省略部分代码......
	@Override
	public void registerBeanDefinition(String beanName, BeanDefinition beanDefinition)
			throws BeanDefinitionStoreException {
				//省略了一些判断代码......
				this.beanDefinitionMap.put(beanName, beanDefinition);
				this.beanDefinitionNames.add(beanName);
				removeManualSingletonName(beanName);
	}
}
其中,beanDefinitionMap的数据结构是ConcurrentHashMap,因此不能保证顺序,为了记录注册的顺序,这里使用了ArrayList类型的beanDefinitionNames用来记录注册顺序。
2.2. 合并阶段
经过了注册阶段,Spring的BeanDefinition容器中已经有了部分BeanDefinition信息(可能还存在通过aware接口或者postProcessor接口注册进来的beanDefinition),下面分为两种情况:
- 对于设置了非懒加载属性的BeanDefinition,在容器启动时(ApplicationContext#refresh())时会最终调用
BeanFactory#getBean()方法进行实例化 - 对于懒加载(isLazyInit)的BeanDefinition,则需要在用到的时候调用
BeanFactory#getBean()方法进行实例化。
事实上,无论哪种情况,Spring最终都会调用BeanFactory#getBean()方法进行实例化。在getBean()方法中会有一个合并阶段:
public abstract class AbstractBeanFactory extends FactoryBeanRegistrySupport implements ConfigurableBeanFactory {
	protected <T> T doGetBean(final String name, @Nullable final Class<T> requiredType,
			@Nullable final Object[] args, boolean typeCheckOnly) throws BeansException {
		//......
		final RootBeanDefinition mbd = getMergedLocalBeanDefinition(beanName);
		//......
	}
}
AbstractBeanFactory#getMergedLocalBeanDefinition()方法完成了BeanDefinition的合并,这里的“合并”的意思是,部分BeanDefinition可能不是RootBeanDefinition(没有parent),而是部分属性需要继承其他BeanDefinition,比如xml配置中的parent属性,这就需要进行一次合并,最终产出RootBeanDefinition。
RootBeanDefinition的parent设置时候会有一个判断,可以看出来,RootBeanDefinition最典型的特点就是没有parent reference:
public class RootBeanDefinition extends AbstractBeanDefinition {
	//......
	@Override
	public void setParentName(@Nullable String parentName) {
		if (parentName != null) {
			throw new IllegalArgumentException("Root bean cannot be changed into a child bean with parent reference");
		}
	}
	//......
}
2.3. 实例化阶段
到了实例化阶段,Spring将转化BeanDefinition中BeanDefinition为实例Bean(放在包装类BeanWrapper中)。
2.3.1. 通过ClassLoader赋值BeanDefinition的beanClass为Class对象
我们首先关注到AbstractAutowireCapableBeanFactory#createBean()方法,AbstractAutowireCapableBeanFactory是DefaultListableBeanFactory的父类,在这个方法中有个过程:
public abstract class AbstractAutowireCapableBeanFactory extends AbstractBeanFactory
      implements AutowireCapableBeanFactory {
	//......
	@Override
	protected Object createBean(String beanName, RootBeanDefinition mbd, @Nullable Object[] args)
			throws BeanCreationException {

		if (logger.isTraceEnabled()) {
			logger.trace("Creating instance of bean '" + beanName + "'");
		}
		RootBeanDefinition mbdToUse = mbd;

		//......

		// Give BeanPostProcessors a chance to return a proxy instead of the target bean instance.
		Object bean = resolveBeforeInstantiation(beanName, mbdToUse);
		if (bean != null) {
				return bean;
		}
		//......

		// Make sure bean class is actually resolved at this point, and
		// clone the bean definition in case of a dynamically resolved Class
		// which cannot be stored in the shared merged bean definition.
		Class<?> resolvedClass = resolveBeanClass(mbd, beanName);
		if (resolvedClass != null && !mbd.hasBeanClass() && mbd.getBeanClassName() != null) {
			mbdToUse = new RootBeanDefinition(mbd);
			mbdToUse.setBeanClass(resolvedClass);
		}
		//......
			Object beanInstance = doCreateBean(beanName, mbdToUse, args);
		//......
	}
	//......
}
可以看到#resolveBeanClass()方法,我们知道,比如通过xml的方式定义的BeanDefinition的beanClass是个字符串,因此这里需要通过这个方法加载Class对象并赋值回beanClass这个属性中。
当然这个细节只是顺便提一下,并不是Bean生命周期中需要太关注的一环。
2.3.2. 实例化前阶段resolveBeforeInstantiation
从上文的代码中我们可以看这个方法AbstractAutowireCapableBeanFactory#resolveBeforeInstantiation(),这就是实例化前阶段,主要是处理注册到容器中的InstantiationAwareBeanPostProcessor#postProcessBeforeInstantiation() ,如果有返回值则将直接用返回值作为实例好的bean进行返回。
可以看到具体代码:
public abstract class AbstractAutowireCapableBeanFactory extends AbstractBeanFactory
      implements AutowireCapableBeanFactory {
	//......
	@Nullable
	protected Object resolveBeforeInstantiation(String beanName, RootBeanDefinition mbd) {
		Object bean = null;
		if (!Boolean.FALSE.equals(mbd.beforeInstantiationResolved)) {
			// Make sure bean class is actually resolved at this point.
			if (!mbd.isSynthetic() && hasInstantiationAwareBeanPostProcessors()) {
				Class<?> targetType = determineTargetType(beanName, mbd);
				if (targetType != null) {
					bean = applyBeanPostProcessorsBeforeInstantiation(targetType, beanName);
					if (bean != null) {
						bean = applyBeanPostProcessorsAfterInitialization(bean, beanName);
					}
				}
			}
			mbd.beforeInstantiationResolved = (bean != null);
		}
		return bean;
	}
	//......
}
2.3.3. 实例化阶段createBeanInstance
public abstract class AbstractAutowireCapableBeanFactory extends AbstractBeanFactory
      implements AutowireCapableBeanFactory {
	//......
	protected Object doCreateBean(final String beanName, final RootBeanDefinition mbd, final @Nullable Object[] args)
			throws BeanCreationException {

		// Instantiate the bean.
		BeanWrapper instanceWrapper = null;
		if (mbd.isSingleton()) {
			instanceWrapper = this.factoryBeanInstanceCache.remove(beanName);
		}
		if (instanceWrapper == null) {
			instanceWrapper = createBeanInstance(beanName, mbd, args);
		}
		//......
		populateBean(beanName, mbd, instanceWrapper);
		exposedObject = initializeBean(beanName, exposedObject, mbd);
		//......

		return exposedObject;
	}
	//......
}
在实例化阶段中, AbstractAutowireCapableBeanFactory#createBeanInstance()方法完成了Bean的创建,并将其放在包装类BeanWrapper中。
2.3.4. 实例化后阶段populateBean
public abstract class AbstractAutowireCapableBeanFactory extends AbstractBeanFactory
      implements AutowireCapableBeanFactory {
	//......
	protected void populateBean(String beanName, RootBeanDefinition mbd, @Nullable BeanWrapper bw) {
		if (bw == null) {
			if (mbd.hasPropertyValues()) {
				throw new BeanCreationException(
						mbd.getResourceDescription(), beanName, "Cannot apply property values to null instance");
			}
			else {
				// Skip property population phase for null instance.
				return;
			}
		}

		// Give any InstantiationAwareBeanPostProcessors the opportunity to modify the
		// state of the bean before properties are set. This can be used, for example,
		// to support styles of field injection.
		if (!mbd.isSynthetic() && hasInstantiationAwareBeanPostProcessors()) {
			for (BeanPostProcessor bp : getBeanPostProcessors()) {
				if (bp instanceof InstantiationAwareBeanPostProcessor) {
					InstantiationAwareBeanPostProcessor ibp = (InstantiationAwareBeanPostProcessor) bp;
					if (!ibp.postProcessAfterInstantiation(bw.getWrappedInstance(), beanName)) {
						return;
					}
				}
			}
		}

		PropertyValues pvs = (mbd.hasPropertyValues() ? mbd.getPropertyValues() : null);

		int resolvedAutowireMode = mbd.getResolvedAutowireMode();
		if (resolvedAutowireMode == AUTOWIRE_BY_NAME || resolvedAutowireMode == AUTOWIRE_BY_TYPE) {
			MutablePropertyValues newPvs = new MutablePropertyValues(pvs);
			// Add property values based on autowire by name if applicable.
			if (resolvedAutowireMode == AUTOWIRE_BY_NAME) {
				autowireByName(beanName, mbd, bw, newPvs);
			}
			// Add property values based on autowire by type if applicable.
			if (resolvedAutowireMode == AUTOWIRE_BY_TYPE) {
				autowireByType(beanName, mbd, bw, newPvs);
			}
			pvs = newPvs;
		}

		boolean hasInstAwareBpps = hasInstantiationAwareBeanPostProcessors();
		boolean needsDepCheck = (mbd.getDependencyCheck() != AbstractBeanDefinition.DEPENDENCY_CHECK_NONE);

		PropertyDescriptor[] filteredPds = null;
		if (hasInstAwareBpps) {
			if (pvs == null) {
				pvs = mbd.getPropertyValues();
			}
			for (BeanPostProcessor bp : getBeanPostProcessors()) {
				if (bp instanceof InstantiationAwareBeanPostProcessor) {
					InstantiationAwareBeanPostProcessor ibp = (InstantiationAwareBeanPostProcessor) bp;
					PropertyValues pvsToUse = ibp.postProcessProperties(pvs, bw.getWrappedInstance(), beanName);
					if (pvsToUse == null) {
						if (filteredPds == null) {
							filteredPds = filterPropertyDescriptorsForDependencyCheck(bw, mbd.allowCaching);
						}
						pvsToUse = ibp.postProcessPropertyValues(pvs, filteredPds, bw.getWrappedInstance(), beanName);
						if (pvsToUse == null) {
							return;
						}
					}
					pvs = pvsToUse;
				}
			}
		}
		if (needsDepCheck) {
			if (filteredPds == null) {
				filteredPds = filterPropertyDescriptorsForDependencyCheck(bw, mbd.allowCaching);
			}
			checkDependencies(beanName, mbd, filteredPds, pvs);
		}

		if (pvs != null) {
			applyPropertyValues(beanName, mbd, bw, pvs);
		}
	}
	//......
}
简单总结,实例化后阶段#populateBean这个方法主要用来进行属性赋值(包括依赖注入),分为以下三个阶段:
InstantiationAwareBeanPostProcessor#postProcessAfterInstantiation(),这个方法决定是否进行属性赋值(返回boolean值)InstantiationAwareBeanPostProcessor#postProcessPropertyValues(),这个方法可以改变具体属性的值。#applyPropertyValues(),进行属性赋值(包括依赖注入)。
2.4. 初始化阶段
初始化阶段的主要工作是在返回bean之前做一些处理,主要由AbstractAutowireCapableBeanFactory#initializeBean进行实现:
public abstract class AbstractAutowireCapableBeanFactory extends AbstractBeanFactory
      implements AutowireCapableBeanFactory {
	//......
	protected Object initializeBean(final String beanName, final Object bean, @Nullable RootBeanDefinition mbd) {
		if (System.getSecurityManager() != null) {
			AccessController.doPrivileged((PrivilegedAction<Object>) () -> {
				invokeAwareMethods(beanName, bean);
				return null;
			}, getAccessControlContext());
		}
		else {
			invokeAwareMethods(beanName, bean);
		}

		Object wrappedBean = bean;
		if (mbd == null || !mbd.isSynthetic()) {
			wrappedBean = applyBeanPostProcessorsBeforeInitialization(wrappedBean, beanName);
		}

		try {
			invokeInitMethods(beanName, wrappedBean, mbd);
		}
		catch (Throwable ex) {
			throw new BeanCreationException(
					(mbd != null ? mbd.getResourceDescription() : null),
					beanName, "Invocation of init method failed", ex);
		}
		if (mbd == null || !mbd.isSynthetic()) {
			wrappedBean = applyBeanPostProcessorsAfterInitialization(wrappedBean, beanName);
		}

		return wrappedBean;
	}
	//......
}
2.4.1. Bean Aware接口回调阶段
Spring提供了很多的Aware接口,这些接口都用于“赋予实现类感知xxx的能力”。比如用途最广泛的ApplicationContextAware接口,就是让实现类拥有了感知到applicationContext的能力,并能直接与applicationContext进行交互。
按照顺序,这些Aware接口有以下顺序:

Aware接口回调主要依靠以下两个方法实现
AbstractAutowireCapableBeanFactory#invokeAwareMethods(),主要处理列表前三种Aware接口AbstractAutowireCapableBeanFactory#applyBeanPostProcessorsBeforeInitialization(),在ApplicationContext容器启动的时候会将除前3种Aware接口外的接口实现转化为BeanPostProcessor,进而在初始化阶段的时候进行调用,在代码中(上文中initializeBean方法)的调用顺序也是符合我们上述的顺序的。
2.4.2. 初始化前阶段applyBeanPostProcessorsBeforeInitialization
初始化前阶段主要通过 AbstractAutowireCapableBeanFactory#applyBeanPostProcessorsBeforeInitialization()方法进行实现,主要是处理 BeanPostProcessor#postProcessBeforeInitialization(),当然这里部分BeanPostProcessor也承担了Aware接口的回调任务,这些BeanPostProcessor是由ApplicationContext容器启动的时候注入的:
public abstract class AbstractApplicationContext extends DefaultResourceLoader
		implements ConfigurableApplicationContext {
	//......
	protected void prepareBeanFactory(ConfigurableListableBeanFactory beanFactory) {
			//......

			// Configure the bean factory with context callbacks.
			beanFactory.addBeanPostProcessor(new ApplicationContextAwareProcessor(this));

			//......
	//......
}
这个阶段除此以外也承担了一些其他的功能,比如处理@PostConstruct注解等,Spring这种类似的拓展都是基于postProcessor去做的。
2.4.3. 初始化阶段invokeInitMethods
由AbstractAutowireCapableBeanFactory#invokeInitMethods实现,主要做两件事:
- 处理
InitializingBean#afterPropertiesSet()方法 - 处理自定义的init-method方法
public abstract class AbstractAutowireCapableBeanFactory extends AbstractBeanFactory
      implements AutowireCapableBeanFactory {
	//......
	protected void invokeInitMethods(String beanName, final Object bean, @Nullable RootBeanDefinition mbd)
				throws Throwable {

		boolean isInitializingBean = (bean instanceof InitializingBean);
		if (isInitializingBean && (mbd == null || !mbd.isExternallyManagedInitMethod("afterPropertiesSet"))) {
			if (logger.isTraceEnabled()) {
				logger.trace("Invoking afterPropertiesSet() on bean with name '" + beanName + "'");
			}
			if (System.getSecurityManager() != null) {
				try {
					AccessController.doPrivileged((PrivilegedExceptionAction<Object>) () -> {
						((InitializingBean) bean).afterPropertiesSet();
						return null;
					}, getAccessControlContext());
				}
				catch (PrivilegedActionException pae) {
					throw pae.getException();
				}
			}
			else {
				((InitializingBean) bean).afterPropertiesSet();
			}
		}

		if (mbd != null && bean.getClass() != NullBean.class) {
			String initMethodName = mbd.getInitMethodName();
			if (StringUtils.hasLength(initMethodName) &&
					!(isInitializingBean && "afterPropertiesSet".equals(initMethodName)) &&
					!mbd.isExternallyManagedInitMethod(initMethodName)) {
				invokeCustomInitMethod(beanName, bean, mbd);
			}
		}
	}
	//......
}
2.4.4. 初始化后阶段
初始化后阶段主要通过 AbstractAutowireCapableBeanFactory#applyBeanPostProcessorsAfterInitialization() 方法进行实现,用来处理
BeanPostProcessor#postProcessAfterInitialization()方法。
这里是否也承担了部分Aware接口回调?这里笔者没有详细进行测试,后续有时间补充。
2.4.5. 初始化完成阶段
初始化完成阶段主要通过 SmartInitializingSingleton接口进行实现,这个功能在Spring4.1+版本得到支持。是在 ApplicationContext#refresh()方法中调用了 ApplicationContext#finishBeanFactoryInitialization() 进行实现。
2.5. 销毁阶段
一般在ApplicationContext关闭的时候调用,也就是AbstractApplicationContext#close() 方法。除此以外也可以主动调用销毁方法。
这里在注册的时候Spring通过适配器模式包装了一个类DisposableBeanAdapter,在销毁阶段的时候会获得这个类,进而调用到DisposableBeanAdapter#destroy()方法:
class DisposableBeanAdapter implements DisposableBean, Runnable, Serializable {
	//......
	@Override
	public void destroy() {
		if (!CollectionUtils.isEmpty(this.beanPostProcessors)) {
			for (DestructionAwareBeanPostProcessor processor : this.beanPostProcessors) {
				processor.postProcessBeforeDestruction(this.bean, this.beanName);
			}
		}

		if (this.invokeDisposableBean) {
			if (logger.isTraceEnabled()) {
				logger.trace("Invoking destroy() on bean with name '" + this.beanName + "'");
			}
			try {
				if (System.getSecurityManager() != null) {
					AccessController.doPrivileged((PrivilegedExceptionAction<Object>) () -> {
						((DisposableBean) this.bean).destroy();
						return null;
					}, this.acc);
				}
				else {
					((DisposableBean) this.bean).destroy();
				}
			}
			catch (Throwable ex) {
				String msg = "Invocation of destroy method failed on bean with name '" + this.beanName + "'";
				if (logger.isDebugEnabled()) {
					logger.warn(msg, ex);
				}
				else {
					logger.warn(msg + ": " + ex);
				}
			}
		}

		if (this.destroyMethod != null) {
			invokeCustomDestroyMethod(this.destroyMethod);
		}
		else if (this.destroyMethodName != null) {
			Method methodToInvoke = determineDestroyMethod(this.destroyMethodName);
			if (methodToInvoke != null) {
				invokeCustomDestroyMethod(ClassUtils.getInterfaceMethodIfPossible(methodToInvoke));
			}
		}
	}
	//......
}
2.5.1. 销毁前阶段
主要由 DestructionAwareBeanPostProcessor#postProcessBeforeDestruction()提供在销毁前需要执行的方法,从上面的代码中也可以看到。
2.5.2. 销毁阶段
这里主要包括三个销毁途径,按照执行顺序有以下:
- @PreDestroy注解,主要通过DestructionAwareBeanPostProcessor实现
- 实现DisposableBean接口,主要通过
DisposableBean#destroy()实现 - 自定义销毁方法
DisposableBeanAdapter#invokeCustomDestroyMethod()实现
3. 一些思考
3.1. 初始化,销毁的几种钩子方法的执行顺序
可以看到,Spring的bean的主要生命周期其实就是注册→合并→实例→初始化→销毁,这之中很多的拓展功能是通过各种各样的BeanPostProcessor去实现的,最典型的就是我们的初始化与销毁阶段的几个钩子方法,按照执行顺序,总结如下:
构造:
@PostConstruct注解,通过InitDestroyAnnotationBeanPostProcessor实现。InitializingBean#afterPropertiesSet方法,在初始化的时候直接调用- 自定义的init-method
销毁:
- @PreDestroy注解,通过DestructionAwareBeanPostProcessor实现
- 实现DisposableBean接口,在销毁的时候直接调用
- 自定义的destroy-method
总结规律就是,注解优先(通过postProcessor实现),接口实现其次(直接调用),自定义最后。
4. 参考
- Spring-5.2.2.RELEASE源代码
- 小马哥极客时间课程《小马哥讲Spring核心编程思想》(安利一波)
- 文章中的整体图源文件(base on omniGraffle)